🎛️

Automation

Advanced automation techniques for dynamic, musical mixes

Automation Fundamentals

What Is Automation?

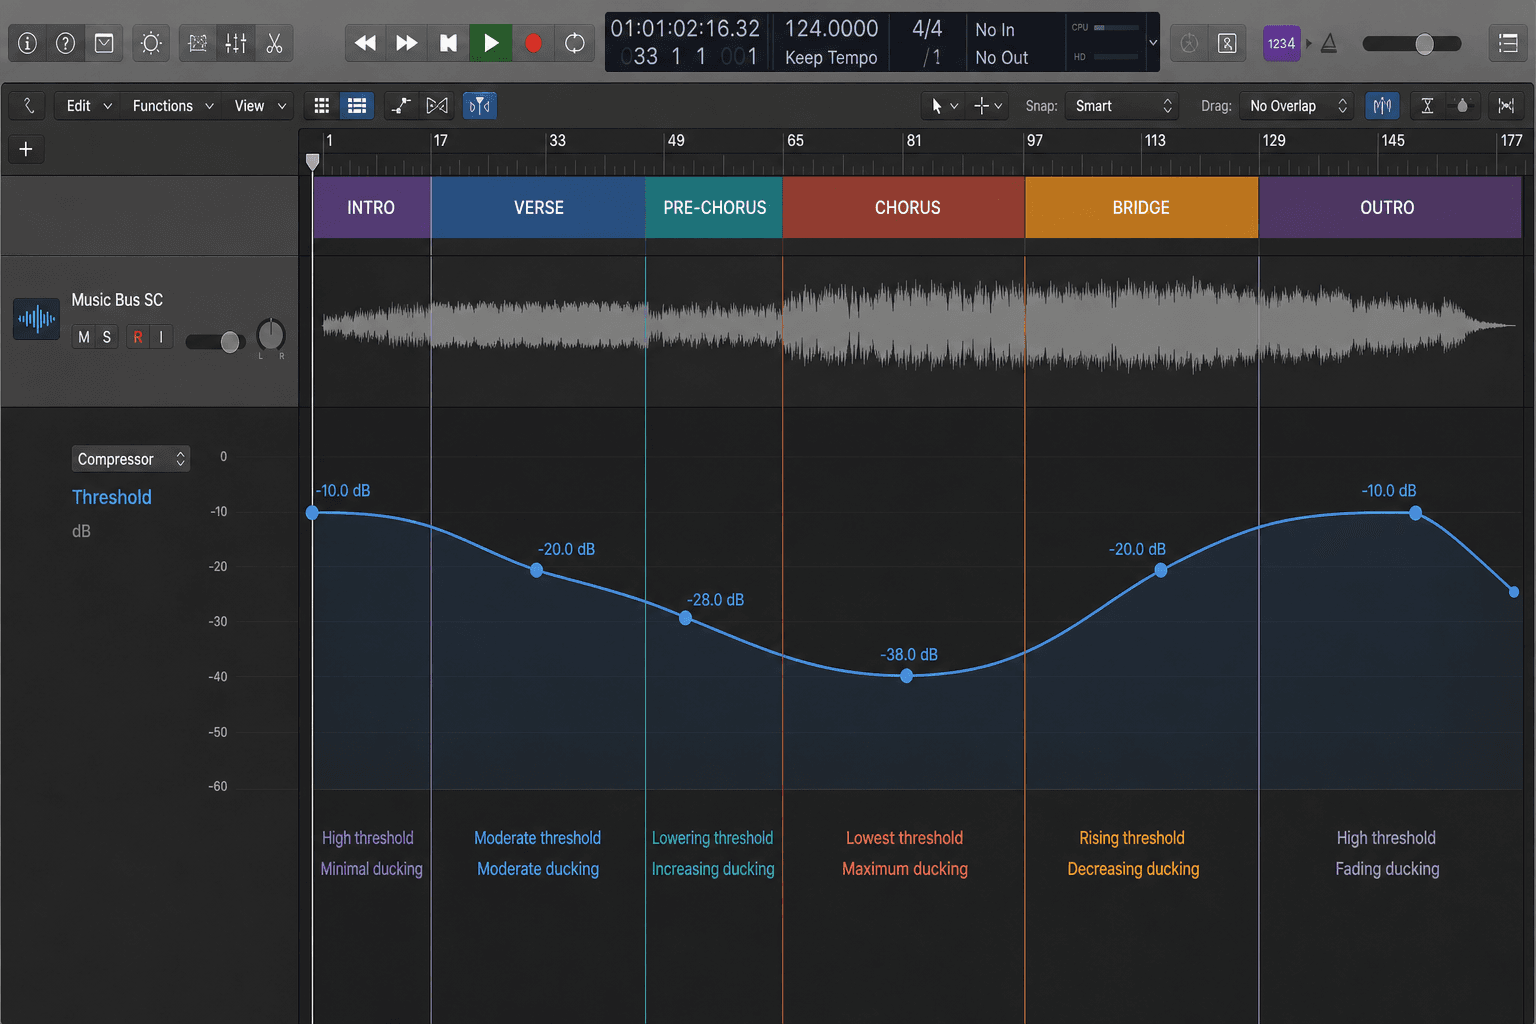
  • Automation records parameter changes over time: volume, pan, sends, plugin parameters, and more.
  • It turns static settings into dynamic, musical movements that evolve with your song.
  • Every automatable parameter can tell a story and create emotional impact.
  • Think of automation as performance: it should feel musical, not mechanical.

Why Automation Matters

  • Static mixes sound lifeless and amateur compared to automated productions.
  • Automation creates focus, directing listener attention to what matters most in each moment.
  • It solves problems that compression and EQ cannot: bringing out one word, one note, one moment.
  • Professional mixes move, breathe, and respond to musical energy through intentional automation.

When to Automate

  • After establishing rough balance, gain staging, and core processing.
  • Do not use automation to fix fundamentally broken balances or badly chosen plugins.
  • Automate when a single static setting compromises another section of the song.
  • Start simple with volume and sends, then expand to more creative parameters.

Volume Automation Lane

Logic Pro volume automation lane showing smooth curves on a vocal track
Volume automation is the foundation of dynamic mixing, allowing precise control of level changes throughout your song.

Automation Modes Explained

Read Mode

  • Plays back existing automation without allowing new recording.
  • Use this mode when mixing other tracks to prevent accidental automation writes.
  • Essential for reviewing and fine-tuning existing automation moves.
  • Default mode for safe playback.

Touch Mode

  • Records automation only while touching the control, then returns to existing automation.
  • Best for surgical fixes and specific moment adjustments.
  • Preserves surrounding automation automatically.
  • Most commonly used mode for manual automation writing.

Latch Mode

  • Records from the moment you touch a control until you stop playback.
  • Overwrites all existing automation from the touch point forward.
  • Useful for long, sustained parameter changes.
  • Requires careful attention to avoid overwriting good automation.

Write Mode

  • Records all parameter movements from the moment playback starts.
  • Overwrites all existing automation immediately and continuously.
  • Rarely used in professional mixing due to destructive nature.
  • Can be useful for starting fresh on heavily automated tracks.

Automation Modes

Logic Pro automation modes menu showing Touch, Latch, Write, and Read options
Understanding automation modes is critical for efficient workflow and preventing accidental overwrites.

Riders vs Gates vs Manual Automation

Use Manual Automation When

  • The fix is specific, musical, and intentional: one loud word, one buried note, one drum fill that should explode.
  • You need precise control over the exact shape and timing of level changes.
  • Creative moves like delay throws, filter sweeps, and effect sends that follow musical phrasing.
  • Automation gives you unlimited control but requires more time investment.

Use a Rider When

  • The performance needs constant small corrections across the entire track: inconsistent vocal dynamics, bass note variations.
  • You want automatic level balancing without the pumping artifacts of heavy compression.
  • Riders work before compression, feeding the compressor a more even signal for cleaner results.
  • Best for natural-sounding leveling on vocals, bass, acoustic guitar, and solo instruments.

Use a Gate When

  • You need automatic cleanup between hits or phrases: drum close mics with cymbal bleed, noisy guitar amps with silence between notes.
  • The goal is noise reduction, not creative effect.
  • Gates work best with clear attack/release patterns and obvious silence between wanted sounds.
  • They work poorly when bleed is musical or when silence is not truly silent.

Vocal Rider Plugin

Vocal rider plugin interface showing automatic level adjustments
Vocal riders automate level adjustments intelligently, saving hours of manual automation while preserving natural dynamics.

Rider vs Gate Decision Matrix

Inconsistent vocal performance with constant level changes

Rider before compressor
Evens out the signal before compression, resulting in cleaner dynamics control without pumping.
Set rider target range narrow (2-3 dB) for transparent results.

Drum close mics with cymbal bleed between hits

Gate with gentle settings or manual editing
Removes unwanted cymbal wash during tom hits and snare silence, tightening the drum sound.
Use longer release times to avoid cutting off natural decay.

Bass guitar with huge dynamic range from slapping and soft notes

Rider + compression in series
Rider handles the big jumps, compressor handles the subtleties, avoiding over-compression.
Use rider first, then light compression (2-4 dB GR max).

One phrase in the chorus that disappears in the mix

Manual volume automation
Surgical fix for a specific moment that does not repeat.
Automate 1-2 dB lift with smooth curves, not sudden jumps.

Acoustic guitar recording with loud pick attacks and quiet fingerstyle sections

Rider for broad leveling, clip gain for extreme transients
Rider handles overall dynamics, clip gain tames a few outlier peaks without affecting everything.
Lower peak transients with clip gain before adding the rider.

Guitar amp recording with hum during silence between riffs

Gate with sidechain filter
Automatic noise reduction without manually editing every gap.
Filter the sidechain to focus on guitar fundamentals, not hum.

Gate Threshold Automation

Logic Pro gate plugin with threshold automation creating dynamic gating behavior
Automating gate threshold allows different cleanup intensity for quiet verses vs loud choruses.

Automating Delay Feedback and Threshold

Delay Feedback Automation

  • Feedback controls how many repeats you hear: low feedback = short tail, high feedback = infinite spinning echoes.
  • Automate feedback up during transitions to create 'delay throws' that bloom into the next section.
  • Automate feedback down before dense lyrical sections to avoid clutter and maintain clarity.
  • Use dramatic feedback spikes (70-95%) for breakdown effects, then pull back to 15-30% for normal delays.
  • Feedback automation is one of the most musical and immediately noticeable automation moves.

Delay Threshold Automation

  • Some delays (especially vintage or tape-style) have built-in ducking or threshold controls.
  • Automating threshold changes how much input is needed before the delay responds, creating dynamic delay presence.
  • Lower threshold = more delay action, higher threshold = delay only on loud peaks.
  • Use threshold automation to make delays appear only on emphasized words or final notes of phrases.
  • Combine threshold automation with send level automation for maximum dynamic control.

Delay Feedback Automation

Logic Pro delay plugin showing dramatic feedback automation curve creating a delay throw effect
Feedback automation creates the iconic 'delay throw' effect, building tension and energy at transitions.

Delay Feedback Automation Techniques

Delay Throw

Jump from 20% to 80-95%, then back down
Create swirling, building tension at the end of a section before a drop or new section
Automate up over 1-2 beats, hold briefly, then pull down quickly

Subtle Section Shift

15% in verse, 35% in chorus
Make choruses feel more spacious and energetic without changing the dry sound
Ramp up smoothly over 1-4 bars at section transition

Freeze Effect

Momentary spike to 100%
Create infinite sustain on one note or word, freezing it in time
Spike to 100% for 1 beat, then drop to 0% or very low

Feedback Swell

Gradually rise from 10% to 60% over 8-16 bars
Build anticipation and intensity during a long build-up section
Slow, smooth automation curve over the entire build section

Dynamic Delay Presence

Low (10-15%) normally, spike to 40-50% on final words of phrases
Make delays appear only on select words for emphasis without constant effect
Short spikes (1-2 beats) on intentional moments only

Parallel Bus with Automation on One Channel

Parallel Bus Automation Concept

  • Create two buses: one dry or lightly processed, one heavily processed (compressed, saturated, distorted).
  • Both buses receive the same source, but only the processed bus has automation.
  • Automate the level of the processed bus to blend in intensity where needed without affecting the dry tone.
  • This technique gives you consistent clean tone with dynamic aggression, sustain, or density.
  • Common uses: parallel drum compression, parallel bass saturation, parallel vocal thickness.

Why This Works

  • You maintain the natural dynamics and transients of the dry signal at all times.
  • The processed bus adds body, sustain, or energy only when and where you choose.
  • Automation becomes a creative blend control rather than a fix for processing issues.
  • It is easier to commit to heavy processing when you know you can automate its contribution.
  • Allows you to have both clean, transparent mixing and aggressive character in the same track.

Parallel Bus Automation

Logic Pro parallel compression bus with automation on the wet channel
Parallel bus automation lets you blend heavy processing dynamically while keeping the dry signal consistent.

Parallel Bus Automation Applications

Drum bus

Heavy compression (8:1, aggressive attack/release)
Compressed bus level: low in verses, higher in choruses
Punchy, explosive drums in choruses while keeping verses dynamic and natural

Bass guitar

Saturation or distortion (Decapitator, SansAmp)
Saturated bus level: automate up during chorus and breakdown riffs
Clean low end stays consistent, aggressive grind appears only when needed

Lead vocal

Dense compression + saturation
Dense bus level: low normally, higher on powerful belted notes
Natural breathy tone on soft phrases, thick powerful sound on climaxes

Snare

Parallel compression or transient enhancement
Parallel level: automate up on fills and hits that need extra crack
Consistent snare tone with dynamic emphasis on important hits

Synth pad

Heavy reverb or shimmer effect
Effect bus level: low in busy sections, high in sparse intros/outros
Lush ambience when space allows, clarity when arrangement is dense

Send Automation Across Multiple Tracks

Logic Pro mixer view showing send automation lanes on multiple tracks
Send automation is powerful for creating dynamic effects that appear and disappear musically.

Filter Cutoff Automation

High-Pass Filter Sweeps

  • Start with a heavy high-pass filter removing lows and mids, creating a thin, distant sound.
  • Automate the cutoff frequency down (opening the filter) to reveal the full sound at a climactic moment.
  • Common in electronic music builds, but works equally well on guitars, synths, vocals, and entire mix buses.
  • Combine with volume automation for an even more dramatic reveal.
  • Use smooth automation curves (1-8 bars) for musical sweeps, not sudden jumps.

Low-Pass Filter Sweeps

  • Start with the low-pass filter open (bright, full-range sound), then automate it closed to create a muffled, distant effect.
  • Useful for creating tension, simulating distance, or preparing for a drop.
  • Automate the filter to close gradually during a build, then snap it open on the drop.
  • Low-pass automation is effective on drum loops, synth pads, guitars, and background vocals.
  • Pair with reverb decay automation for even more dramatic depth shifts.

Filter Sweep Automation

Logic Pro filter cutoff automation showing an upward frequency sweep
Filter sweeps create excitement and anticipation, making transitions feel intentional and energetic.

Pan Automation for Width and Movement

Static Pan vs Automated Pan

  • Static panning creates a fixed stereo image: vocals center, guitars left/right, etc.
  • Automated panning creates movement, excitement, and evolving width throughout the song.
  • Use pan automation sparingly on lead elements to avoid disorienting the listener.
  • Background elements, ear candy, and effects can move freely without causing issues.
  • Pan automation can make a simple part feel dynamic and engaging.

Pan Automation Techniques

  • Auto-pan effects: rhythmic left-right movement synced to tempo for tremolo-style motion.
  • Widening choruses: automate stereo elements slightly wider during chorus sections for expansiveness.
  • Ear candy movement: automate synth arpeggios or delay tails to drift across the stereo field.
  • Collapse and expand: narrow the mix during verses, widen during choruses for dynamic contrast.
  • Avoid automating low-frequency elements (kick, bass, sub) to maintain solid low-end imaging.

Pan Automation Movement

Logic Pro pan automation showing stereo movement from left to right
Pan automation adds motion and width, making static arrangements feel alive and engaging.

Advanced Automation Targets

Reverb Decay Time

Controls how long reverb tails sustain
Short decay (0.5-1s) in verses, long decay (2-4s) in choruses for depth contrast
Automate decay longer at the end of phrases to create space without constant wetness

Reverb Pre-Delay

Sets the gap between dry signal and reverb onset
Increase pre-delay in dense mixes to separate dry vocal from reverb tail
Automate pre-delay shorter on sustained notes, longer on fast phrases

Compressor Threshold

Changes how much compression is applied dynamically
Lower threshold in quiet sections for more support, higher in loud sections to preserve dynamics
Useful for maintaining consistent compression feel across widely varying input levels

Compressor Ratio

Changes compression intensity from gentle to aggressive
Automate ratio higher (6:1-10:1) on aggressive sections, lower (2:1-3:1) on smooth sections
Rarely used but powerful for creating distinctly different compression character per section

EQ Band Gain

Dynamically boosts or cuts specific frequencies
Boost high-mids on lead vocal during chorus for presence, reduce during verse for intimacy
Automate narrow cuts to remove resonances that only appear in certain sections

EQ Filter Frequency

Moves the center frequency of a boost or cut
Sweep a resonant peak for creative filter effects or dynamic tonal shifts
Automate high-pass filter higher during verses to clear space, lower in chorus for fullness

Saturation Drive/Mix

Controls distortion intensity and blend
Increase saturation during aggressive sections, back off for clean intimate moments
Automate mix percentage rather than drive to maintain consistent character with variable intensity

Stereo Width

Narrows or widens the stereo image
Narrow verses for focus, widen choruses for expansiveness
Avoid widening low frequencies or you will lose mono compatibility

Transient Designer Attack

Emphasizes or softens initial transients
Boost attack on drum fills and impactful hits, soften on smooth sustained sections
Small changes (10-20%) create noticeable impact without sounding processed

Transient Designer Sustain

Lengthens or shortens the body of a sound
Increase sustain on drums for energy, decrease for tightness and control
Combine with parallel compression for maximum sustain control

De-esser Frequency

Targets different sibilance ranges dynamically
Automate frequency lower for darker 'sh' sounds, higher for brighter 's' sounds
Useful when sibilance character changes between sections (breathy verse vs belted chorus)

Limiter Ceiling

Sets maximum output level before clipping
Automate ceiling lower for streaming masters, higher for club/loud masters
Rarely needed but useful when creating multiple master versions from one session

Compressor Threshold Automation

Logic Pro compressor with threshold automation curve
Threshold automation adjusts compression intensity dynamically to match the energy of each section.

Reverb Decay Automation

Logic Pro reverb plugin with decay time automation changing between sections
Decay time automation creates dramatic depth shifts between intimate verses and expansive choruses.

EQ Automation for Dynamic Tone Shaping

Surgical EQ Automation

  • Automate narrow cuts to remove resonances that only appear in certain notes or sections.
  • Example: A vocal has a harsh 3kHz spike only on certain vowels, automate a cut just for those moments.
  • Use high-Q (narrow) cuts with 3-6 dB depth, automated in and out as needed.
  • This approach is more transparent than static EQ, which may dull other parts to fix one problem.
  • Common on vocals, acoustic guitars, and any source with inconsistent tonal issues.

Broad Tone Automation

  • Automate broad shelf or bell curves to change the overall tone color between sections.
  • Example: Boost 10kHz shelf by 2 dB in the chorus to make vocals more present and airy.
  • Use low-Q (wide) curves with 1-3 dB changes for smooth, natural-sounding tonal shifts.
  • Helps vocals, guitars, and synths shift character to match the emotional energy of each section.
  • Pair with send level automation for maximum tonal and spatial control.

EQ Band Automation

Logic Pro EQ plugin showing multiple frequency band automation lanes
Multi-band EQ automation allows precise, dynamic tonal adjustments that respond to the song's needs.

VCA Faders and Group Automation

What Are VCA Faders?

  • VCA (Voltage Controlled Amplifier) faders control the level of multiple tracks simultaneously without summing them to a bus.
  • Automating a VCA fader affects all assigned tracks while preserving their relative balance.
  • VCAs are perfect for controlling groups like 'All Drums', 'All Vocals', or 'All Guitars' dynamically.
  • Unlike bus faders, VCAs do not route audio or add processing—they are pure control automation.
  • Essential for large mixes where you need dynamic group control without affecting routing or processing.

VCA Automation Strategies

  • Automate the drum VCA to lower during verses and raise during choruses for dynamic energy control.
  • Automate backing vocal VCA separately from lead vocal for independent balance control.
  • Use VCA automation to duck entire instrument groups during important vocal phrases.
  • Combine VCA automation with individual track automation for layered, detailed mix movements.
  • VCAs make mix revisions easier: change the group balance without redoing individual automation.

VCA Group Automation

Logic Pro track stack showing VCA fader automation controlling multiple grouped tracks
VCA automation provides powerful control over entire instrument groups while preserving relative balance.

Wet/Dry Mix Automation

Plugin Wet/Dry Automation

  • Many plugins have internal wet/dry mix controls that blend processed and unprocessed signal.
  • Automate the mix parameter to make effects appear and disappear without changing send levels.
  • Example: Automate a chorus plugin from 0% wet in verses to 40% wet in choruses for movement.
  • Works beautifully on modulation effects, distortion, reverb, and stereo widening.
  • More transparent than automating plugin bypass, which can cause clicks.

Effect Blend Techniques

  • Start with 100% wet on return tracks, then use send automation to control effect level.
  • Or use 100% wet on inserts and automate the plugin's internal mix for different control.
  • Automating wet/dry mix feels more gradual and musical than on/off bypass automation.
  • Use smooth curves (2-4 bars) when automating wet/dry to avoid abrupt tonal shifts.
  • Great for making delays, reverbs, modulation, and distortion effects evolve throughout the song.

Wet/Dry Mix Automation

Logic Pro distortion plugin with wet/dry mix automation
Wet/dry automation creates smooth transitions from clean to processed tones without routing changes.

Sidechain Automation for Dynamic Ducking

Sidechain Compression Automation

  • Sidechain compression ducks one track when another plays: bass ducks when kick hits, synths duck when vocals sing.
  • Automate the sidechain threshold or ratio to change ducking intensity between sections.
  • Example: Heavy kick-sidechain ducking on bass during verses, lighter ducking during choruses for fullness.
  • Automate sidechain mix or depth controls if your compressor has them.
  • Sidechain automation is powerful in electronic music, but also useful in rock and pop for vocal clarity.

Sidechain Filter Automation

  • Many sidechain compressors let you filter the detection signal to focus on specific frequencies.
  • Automate the sidechain filter frequency to change which part of the trigger signal causes ducking.
  • Example: Automate sidechain filter higher to duck only on kick fundamental, lower to include bass guitar.
  • Prevents unwanted ducking from cymbals or hi-hats when only kick should trigger compression.
  • Advanced technique for surgical, transparent ducking without over-processing.

Sidechain Automation

Logic Pro sidechain compression with key filter automation
Sidechain automation creates dynamic space and clarity by making elements duck out of each other's way musically.

Tempo and Time-Based Automation

Tempo Automation

  • Automate the project tempo to create accelerandos (speed ups) or ritardandos (slow downs).
  • Use tempo automation to build tension: gradually increase tempo during a build section.
  • Create dramatic ritardandos at the end of songs for a natural, human feel.
  • Tempo automation affects all tempo-synced effects (delays, LFOs, sequencers).
  • Use smooth curves for gradual tempo changes, stepped automation for sudden shifts.

Delay Time Automation

  • Automate delay time (not tempo-synced) for pitch-shifting tape delay effects.
  • Shortening delay time creates upward pitch bends, lengthening creates downward pitch bends.
  • Great for risers, falls, and lo-fi tape-style effects.
  • Combine with feedback automation for wild, experimental textures.
  • Keep changes subtle (5-20ms) for musicality, or go extreme for sound design.

Tempo Automation

Logic Pro tempo automation showing BPM ramp from 120 to 140
Tempo automation creates urgency and energy, making build sections feel naturally accelerating.

Mute Automation for Arrangement and Effects

Arrangement Mute Automation

  • Mute automation removes tracks or regions from the mix entirely at specific moments.
  • Use mute automation to create breakdowns, drops, and arrangement changes without deleting regions.
  • Automate mutes on backing vocals, doubled guitars, or ear candy to vary arrangement dynamically.
  • Easier to revise than cutting regions, and allows instant A/B comparison.
  • Mute automation is non-destructive and fast for trying different arrangement ideas.

Stutter and Gating Effects

  • Rapid on/off mute automation creates stuttering, glitchy rhythmic effects.
  • Automate mutes in rhythmic patterns (1/16th notes, triplets) for EDM-style gating.
  • Combine with delay feedback spikes for chaotic transition effects.
  • Use on vocals, synths, or entire drum groups for dramatic drops and builds.
  • Can replace or enhance tremolo and gate plugins with more precise control.

Mute Automation Stutter

Logic Pro showing rapid mute automation creating stuttering effect
Mute automation creates dramatic stutters and rhythmic gating effects for modern production styles.

Pitch Correction Automation

Retune Speed Automation

  • Pitch correction plugins like Auto-Tune and Melodyne have retune speed controls that determine how fast pitch is corrected.
  • Automate retune speed slow (natural) in verses, fast (tight/robotic) in choruses for dynamic vocal character.
  • Allows you to have natural, emotional verses and polished, powerful choruses from one vocal take.
  • Also useful for artistic effect: extreme fast retune for T-Pain/Cher-style auto-tune sound.
  • Automate retune speed per word or phrase for maximum flexibility.

Formant and Throat Automation

  • Formant controls change the tonal character without changing pitch: darker or brighter vocal timbre.
  • Automate formant to make vocals sound larger, smaller, more masculine, or more feminine.
  • Throat length controls add depth and body or thinner, brighter character.
  • Use subtle formant automation (±5-10%) for natural tonal variation between sections.
  • Extreme automation creates vocal transformation effects and harmonizer-style sounds.

Pitch Correction Automation

Logic Pro pitch correction plugin with retune speed automation
Pitch correction automation allows natural and tight tuning within the same vocal performance.

Transient Shaper Automation

Attack Automation

  • Transient designers increase or decrease the initial attack transient of percussive sounds.
  • Automate attack parameter higher during drum fills and impactful moments for extra punch.
  • Reduce attack during smooth, laid-back sections to soften the sound.
  • Works on drums, bass, guitars, piano—anything with clear attack transients.
  • Small changes (10-30%) make a big difference in perceived energy.

Sustain Automation

  • Sustain parameter controls the body and decay of a sound after the transient.
  • Automate sustain higher in choruses for fuller, longer-lasting drum hits.
  • Reduce sustain in verses for tighter, more controlled drums.
  • Combine attack and sustain automation for complete dynamic character control.
  • Transient automation is less obvious than compression but equally powerful.

Transient Shaper Automation

Logic Pro transient designer showing attack and sustain automation
Transient automation shapes the attack and body of sounds dynamically for energy control.

Automation Curve Shapes and Timing

Linear Curves

  • Straight-line automation between two points.
  • Feels mechanical and even, good for smooth fades and predictable changes.
  • Use for fade-outs, volume rides, and send level changes.
  • Best when you want steady, constant change without acceleration.

Exponential Curves

  • Slow start with rapid acceleration toward the end (or vice versa).
  • Feels more natural and musical than linear curves.
  • Use for filter sweeps, crescendos, and dramatic builds.
  • Match the curve shape to the emotional intent of the moment.

Stepped Automation

  • Sudden jumps between values with no curve.
  • Useful for switching between discrete states: mute on/off, bypass on/off, preset changes.
  • Sounds abrupt and intentional, not smooth.
  • Great for creative effects and EDM-style gating but avoid on volume for smooth mixing.

Automation Curve Shapes

Logic Pro showing different automation curve shapes side by side
The shape of your automation curves changes how the movement feels emotionally and musically.

Clip Gain vs Track Volume Automation

When to Use Clip Gain

  • Clip gain adjusts the level of individual regions or clips before any processing.
  • Use clip gain for big, obvious fixes: one loud word, one quiet note, huge dynamic inconsistencies.
  • Clip gain happens before plugins, so changes affect how compressors and EQs respond.
  • Faster and more permanent than automation: it is like re-recording the source at a different level.
  • Clip gain is destructive if not used carefully, but powerful for surgical fixes.

When to Use Track Volume Automation

  • Track volume automation happens after all plugins, controlling the final fader level.
  • Use track automation for musical rides, section balance changes, and dynamic mixing.
  • Automation is non-destructive and easy to adjust, perfect for iterative mixing.
  • Track automation is what you see and hear in the final mix.
  • Best for subtle moves and broad mixing decisions that may need frequent tweaking.

Clip Gain vs Automation

Logic Pro comparison of clip gain and track volume automation
Clip gain fixes problems at the source, while track automation shapes the final mix musically.

Relative vs Absolute Automation

Absolute Automation (Default)

  • Automation sets exact parameter values: volume at -6 dB, pan at 45 left, send at -12 dB.
  • If you move the fader manually after writing automation, the automation overrides your change on playback.
  • Best for final, committed automation moves that should not change.
  • Most common mode and easiest to understand for beginners.
  • If you need to adjust levels after automation, you must edit the automation itself.

Relative Automation

  • Automation writes offsets from the current fader position instead of absolute values.
  • Moving the fader after writing relative automation shifts all automation by that amount.
  • Useful for making broad level changes to already-automated tracks without redoing automation.
  • Example: If vocal is automated and needs to be 2 dB louder overall, move the fader +2 dB and all automation follows.
  • Advanced feature rarely used but extremely powerful for mix revisions.

Relative vs Absolute Automation

Logic Pro showing relative vs absolute automation comparison diagram
Relative automation allows broad fader changes to affect all automation proportionally.

Automation Snapshots and Recall

Saving Automation Snapshots

  • Automation snapshots capture the current state of all automation across the entire project.
  • Use snapshots to save different mix versions or automation approaches for A/B comparison.
  • Essential for client revisions: save the original automation before making requested changes.
  • Snapshots are faster than saving full project versions when only automation changes.
  • Logic Pro, Pro Tools, and most DAWs support some form of automation snapshot or playlist.

Recalling and Comparing

  • Recall snapshots instantly to compare different automation approaches during mixing.
  • Use snapshots to undo broad automation changes without losing individual edits.
  • Combine snapshots with VCA automation for powerful, flexible mixing workflows.
  • Snapshots are non-destructive: you can always return to any saved state.
  • Great for 'what if' experimentation without fear of losing good work.

Automation Snapshots

Logic Pro automation snapshot menu showing saved states
Automation snapshots allow instant recall of different mix automation versions for comparison.

LFO and Modulation Automation

LFO-Driven Automation

  • LFOs (Low-Frequency Oscillators) create rhythmic, repeating automation patterns automatically.
  • Use LFO tools to automate filter cutoff, pan, volume, or any parameter with rhythmic pulsing.
  • Sync LFO rate to tempo (1/4 notes, 1/8 notes, 1/16 notes) for musical pulsing effects.
  • Automate LFO rate, depth, or shape for evolving modulation throughout the song.
  • Common in electronic music but powerful in any genre for movement and energy.

Modulation Wheel Automation

  • On MIDI synth tracks, automate the modulation wheel (CC1) for expressive filter, vibrato, or volume changes.
  • Mod wheel automation can control any synth parameter assigned to it, creating dynamic timbral shifts.
  • Record mod wheel automation in real-time by performing with a MIDI controller, or draw it manually.
  • Use mod wheel automation to bring static synth sounds to life with evolving brightness and movement.
  • Essential for realistic string and brass synth performances.

LFO Automated Filter

Logic Pro LFO tool creating rhythmic filter automation
LFO automation creates rhythmic pulsing effects synced to tempo for modern production movement.

Modulation Wheel Automation

Logic Pro modulation wheel automation on synthesizer track
Mod wheel automation brings expressive, human-like dynamics to synthesizer performances.

Stereo Width Automation

Narrow vs Wide Automation

  • Stereo width controls adjust how spread out a sound is across the stereo field.
  • Automate width narrower (more mono) during verses for focus and intimacy.
  • Automate width wider during choruses for expansiveness and energy.
  • Avoid widening low-frequency elements (kick, bass, sub) or you will lose mono compatibility.
  • Width automation is powerful on pads, synths, background vocals, and overheads.

Width Automation Safety

  • Always check mono compatibility when using width automation: fold to mono and listen for phase cancellation.
  • Subtle width changes (10-30%) are often more musical than extreme widening.
  • Use mid/side EQ instead of pure width for safer, more controlled stereo manipulation.
  • Combine width automation with pan automation for complex, evolving stereo images.
  • Width automation can make small arrangements feel huge without adding more tracks.

Stereo Width Automation

Logic Pro stereo width automation on synth pad
Width automation creates dynamic expansiveness, making choruses feel bigger without additional tracks.

De-esser Frequency Automation

Dynamic Sibilance Control

  • Sibilance (harsh 's' and 'sh' sounds) can vary in frequency between vocal sections.
  • Automate de-esser center frequency to target brighter sibilance in belted choruses, darker sibilance in breathy verses.
  • Static de-esser settings often work great in one section but miss or over-process in another.
  • Frequency automation is subtle but makes a big difference in vocal clarity and naturalness.
  • Typically automate within a narrow range: 6kHz to 9kHz for most vocals.

Threshold and Depth Automation

  • Automate de-esser threshold to apply more de-essing in loud, sibilant sections and less in soft sections.
  • Automate de-esser depth (amount of reduction) for variable control intensity.
  • Prevents over-processing soft phrases while effectively controlling loud sibilance.
  • Combine frequency, threshold, and depth automation for surgical sibilance control.
  • Advanced technique but yields the most natural, transparent vocal de-essing.

De-esser Automation

Logic Pro de-esser with frequency and threshold automation
De-esser automation targets different sibilance characteristics dynamically for natural-sounding vocal control.

Bus Processing Bypass Automation

Effect Bus On/Off Automation

  • Automate effect bus sends or plugin bypass to turn effects on and off musically.
  • Example: Turn off reverb bus during fast rap verses, turn on during sung choruses.
  • Bypass automation can cause clicks if not handled carefully: use smooth crossfades or mute automation instead.
  • Great for making dense arrangements feel less cluttered by removing effects when not needed.
  • Combine with send level automation for smoother transitions than pure bypass.

Parallel Processing Automation

  • Automate the blend of parallel compression, saturation, or reverb buses for dynamic intensity.
  • Example: Parallel drum compression low in verses, high in choruses for explosive energy.
  • Allows you to commit to heavy processing knowing you can dial it back whenever needed.
  • More flexible than automating plugin parameters because you can adjust the source and processed balance independently.
  • Essential technique for modern, dynamic mixing.

Bus Bypass Automation

Logic Pro showing bus processing bypass automation
Bus bypass automation creates dramatic effect presence changes for dynamic arrangements.

Smart Controls and Macro Automation

What Are Smart Controls?

  • Smart Controls map multiple plugin parameters to a single control knob or fader.
  • Example: One smart control adjusts reverb mix, decay time, and pre-delay simultaneously for a 'depth' control.
  • Automate the smart control to morph multiple parameters at once with one automation lane.
  • Simplifies complex automation and makes mixing faster and more intuitive.
  • Available in Logic Pro, Ableton Live (Macro controls), and many plugin formats.

Macro Automation Strategies

  • Create macro controls for common moves: 'Vocal Presence' (EQ + saturation + compression), 'Drum Energy' (parallel compression + transient shaping).
  • Automate macros instead of individual parameters for faster, more musical mixing.
  • Use macros for client revisions: 'Make the vocal brighter' becomes one automation move, not five.
  • Macros are especially powerful on complex, multi-effect chains and bus processing.
  • Once set up, macros save hours of tedious individual parameter automation.

Smart Control Automation

Logic Pro smart control automation controlling multiple linked parameters
Smart controls let you automate complex multi-parameter changes with a single automation lane.

Pre-Fader vs Post-Fader Send Automation

Post-Fader Sends (Default)

  • Post-fader sends are affected by the track fader level: lower fader = less send signal.
  • Use post-fader sends for reverbs and delays where the effect should follow the dry level.
  • If you automate the track fader down, the send level automatically goes down too.
  • Most natural and common for time-based effects.
  • Send automation on post-fader sends is relative to the fader position.

Pre-Fader Sends

  • Pre-fader sends are independent of the track fader: effect level stays constant regardless of fader.
  • Use pre-fader sends when you want effects to continue even as the dry track fades out.
  • Example: Fade a vocal out while the reverb tail continues at full level for a ghostly effect.
  • Also useful for headphone monitor mixes that should not be affected by mix fader changes.
  • Pre-fader send automation is completely independent of track volume automation.

Pre-Fader vs Post-Fader Sends

Logic Pro signal flow diagram showing pre-fader and post-fader send points
Pre-fader and post-fader sends behave differently with fader automation, offering creative flexibility.

Region-Based Automation

What Is Region-Based Automation?

  • Some DAWs (Studio One, Cubase) allow automation to be tied to regions rather than timeline position.
  • When you move or copy a region, its automation moves with it automatically.
  • Useful for creating templates, loops, and repeating sections with built-in automation.
  • In Logic Pro, you can achieve similar results with automation follows region events preference.
  • Region automation makes arrangement experimentation faster and less destructive.

Use Cases

  • Build chorus automation once, then copy the entire region with automation to every chorus.
  • Create effect-heavy breakdown regions with automation, then move them freely in the arrangement.
  • Template building: create regions with automation baked in for quick song starts.
  • Experimental arrangement: try different section orders without manually adjusting automation.
  • Essential for loop-based production and remixing workflows.

Region-Based Automation

Logic Pro showing region-based automation following regions
Region-based automation follows audio/MIDI regions, making arrangement changes easier.

Limiter Ceiling Automation for Mastering

Variable Loudness Masters

  • Automate mastering limiter ceiling to create different loudness targets for different master versions.
  • Example: -1.0 dBFS ceiling for streaming/digital, -0.1 dBFS ceiling for club/DJ masters.
  • Automate ceiling lower for conservative loudness, higher for aggressive loudness.
  • Allows one mastering session to generate multiple master versions with different loudness without re-mixing.
  • Combine with limiter threshold or release automation for even more dynamic control.

Dynamic Loudness Control

  • In rare cases, automate limiter ceiling within a song for dynamic loudness shifts (less common).
  • Example: Automate ceiling lower during quiet intros for more dynamic range, higher during loud sections for density.
  • More common in soundtrack and post-production than music mixing.
  • Most music benefits from consistent mastering limiting throughout; use mix automation instead.
  • Advanced technique requiring careful loudness metering and comparison.

Limiter Ceiling Automation

Logic Pro mastering limiter with ceiling automation
Limiter ceiling automation allows multiple master loudness versions from a single mastering session.

Common Automation Mistakes and Solutions

Over-automating everything

Excitement about automation leads to automating every parameter constantly
Mute automation lanes and listen: if the song feels better without certain automation, delete it
Automate with intention, not just because you can

Automation clicks and pops

Sudden jumps in automation curves or bypass automation without crossfades
Use smooth curves, add intermediate points, or use plugin mix automation instead of bypass
Always preview automation changes solo before playing in context

Automation fighting compression

Automating volume before compression causes compressor to respond inconsistently
Use clip gain or pre-fader automation before compression, track volume automation after
Understand signal flow: compression before fader, automation after

Losing automation when moving regions

Automation is timeline-based, not region-based in most DAWs
Enable 'automation follows regions' preference or manually copy automation
Be aware of whether your DAW uses timeline or region automation

Too many automation lanes visible

Cluttered workspace makes mixing slower and harder to navigate
Show only automation lanes currently being edited, hide others
Use automation lane visibility shortcuts for fast toggling

Forgetting what parameters are automated

Automation is invisible until you show lanes, causing confusion during mixing
Check automation indicators on track headers, use show all automation command regularly
Name automation lanes descriptively, use colors for different automation types

Automation in wrong mode (Latch vs Touch)

Accidentally overwrite good automation because mode was set to Latch
Always set tracks to Read mode when not actively automating
Check automation mode before every automation pass

Automation Workflow Checklist

  • Set rough static balance first: faders, panning, gain staging, and core processing before any automation.
  • Identify problem moments: which words disappear, which sections lack energy, where does the mix feel static?
  • Start with volume automation: bring up buried elements, tuck back distractions, create section contrast.
  • Add send automation: make reverbs and delays appear and disappear musically, not constantly.
  • Automate effect parameters: delay feedback throws, filter sweeps, reverb decay changes between sections.
  • Use riders and gates where appropriate: constant level control on vocals/bass, cleanup on drums/guitars.
  • Experiment with advanced automation: EQ bands, compressor thresholds, stereo width, transient shapers.
  • Review all automation with lanes muted: confirm each automation move improves the mix measurably.
  • Set tracks to Read mode when finished: prevent accidental automation overwrites during mixing.
  • Save automation snapshots: capture different automation approaches for easy A/B comparison.
  • Check mono compatibility: ensure stereo width and pan automation do not cause phase issues.
  • Listen at low volume: automation moves should be obvious even at quiet listening levels.
  • Export and review: listen outside the DAW to confirm automation translates to final delivery formats.
  • Document automation strategy: note which tracks are automated and why for future recall and revisions.

Automation Philosophy and Best Practices

Automate with Intent

  • Every automation move should serve the song emotionally and musically.
  • Avoid automating just because the feature exists; automate because the mix demands it.
  • Ask: does this automation improve clarity, energy, emotion, or focus?
  • If you cannot hear or feel the difference, the automation is not helping.

Start Simple, Add Complexity

  • Begin with volume and send automation before diving into plugin parameter automation.
  • Master basic automation before experimenting with advanced techniques like macro controls and LFO modulation.
  • Simple automation executed well beats complex automation done poorly.
  • Build automation layers gradually, checking each addition for actual improvement.

Automation Is Performance

  • Think of automation as another instrument: it should groove, breathe, and respond to the song's energy.
  • Avoid mechanical, stiff automation curves; use smooth, musical transitions.
  • Automation timing matters: early or late automation can make or break the effect.
  • Record automation in real-time when possible for natural, human feel.

Final Thoughts on Automation

Automation Separates Amateurs from Professionals

  • Amateur mixes are static: one setting for the entire song, compromising every section.
  • Professional mixes are dynamic: every section gets the exact balance, effect level, and tone it needs.
  • Automation is not a luxury or an optional final step; it is fundamental to competitive mixing.
  • The best mixes feel alive, responsive, and intentional because of thoughtful automation.
  • Invest time learning automation: the return is immediately audible in your mixes.

Automation Is Creative Freedom

  • With automation, you are no longer limited to one static tone, balance, or effect level.
  • Automation unlocks creative possibilities: delay throws, filter builds, dynamic ducking, evolving textures.
  • It allows you to commit to bold processing knowing you can automate its intensity per section.
  • Automation makes mixing feel less like compromise and more like creative expression.
  • Master automation, and your mixes will feel as dynamic and exciting as the best commercial productions.